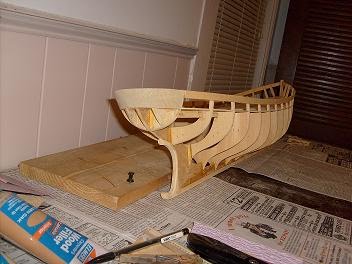
with the deck in place and the rabbits as well, we can go on to the next step....planking. I have never done this before, nor have I ever done a wood ship model, but ever since this kit entered the house, I've had a hard time keeping my hands out of the box. I examined everything....the wood plates with the parts printed on them, the planks, and what hardware there was in the box I received. the nail aspect kind of worried me, the wood being so dry, that it may split and I would ruin the kit. I decided to cement the planks on, using common household clothes pins. the first few planks were easy to do. I started with the first plank at the top.


once this was done, I let it dry overnight. I could see that using white glue, it was going to turn this into a long process. I would have to find a faster drying cement. from here, I went on, adding more planks to the hull. I tried to stay even so that i wouldn't warp the frame. the nice thing about this hull configuration is that so far, I haven't had to bend any of the planks.
after i got the third plank on the starboard side, I did the port side in the same manner. the is quite a curvature to the bow, I had left a 2 plank space in there and later made filler boards to close that up. I didn't do that until I got the port side done to the same degree. as I looked into the deck area, I was happy to see that there was hardly a gap between the deck and the bulwark. I took note of the printed deck layout and decided that I would make the two borders along the bulwarks. then I could fill in the rest with deck planking.

soon the planks fell below the deck and my idea slowly went south. the ribs are quite thick and there was no way I was going to use my clothes pin any longer. I tried a few ingenious ways to lay the next planks...I won't outline them here, because they didn't work! my last resort was push pins......not a good idea either, because it split the wood....quite badly in one area at the stern. there was no way around it, I had to use the nails. I didn't want to use them. I wanted to stay away from the possibility of unsightly nail dimples. I guess I'll just have to make sure that there aren't any. I repaired the mistake to the stern rib and went on to the next idea....I went to the hobby store.
I came back with two things, a faster drying glue and a set of tiny drill bits and a hand twist drill to make pilot holes with. I could not find the nail installer....for some reason, the hobby store didn't carry them. I got the next best thing. I remembered an automotive tool that I had.....it has a short blunt tipped shaft and a handle grip.....part of a tool set to install rear main seals {not any more!}. I put the smallest drill bit in the twist drill and went to work. WOW!!! it was so easy! I pushed the nails in as far as the tool would insert them. I could always go back later when it was time to putty, to push them in a bit further. I also made the two deck borders...they still have to be notched.


one other thing I thought of was the mast. was this hole the only means by which it was to be cemented in? the idea of creating a mast pot came to mind. I cemented a plate on the beams under where the mast hole is and I will install a nail or the shaft of a push pin at the bottom of the mast. once it is centered, I can simply push it through the plate and create a sturdier base for it.
I have to look at the cargo holds to see what I should do concerning them. as I get closer to the keel, I'll be keen to be sure that both sides are identical. then I can look at closing up the stern cavity. for now, I'm gonna sit back and enjoy nail'in those planks!